How To Crop In Kittl
In the world of photo editing, precision and fine-tuning can make all the difference. Whether you’re a professional photographer, an aspiring artist, or simply someone who enjoys capturing moments, having the ability to crop your images effectively is essential. In this article, we will explore the art of cropping in Kittl, a powerful image editing tool that allows you to transform your photos with ease. With its user-friendly interface and advanced features, Kittl empowers users to bring out the best in their images by selectively removing unwanted elements and focusing on the key subject matter.
Understanding the Basics of Cropping
- Understanding the Basics of Cropping
- Getting Started with Kittl’s Crop Tool
- Perfecting Your Crop
- Advanced Techniques and Creative Cropping
- An Introduction to Kittl Designer – Tutorial Video & Transcript
- Kittl Designer Walk Thru – Transcription Below
- Featured Kittl Designs (Top left) & New Projects
- Build Designs from Scratch in Kittl
- Color Palettes & Naming Designs in Kittl
- Kittl Subscriptions & Try it for Free
- Conclusion:
- FAQs
Before we dive into the world of Kittl’s cropping capabilities, let’s understand the basics of cropping itself. Cropping refers to the process of removing unwanted portions of an image to enhance its composition or emphasize a specific subject. By adjusting the dimensions and aspect ratio, you can create a visually pleasing and balanced image. Cropping plays a crucial role in directing the viewer’s attention and can transform an ordinary photo into a captivating work of art.
Getting Started with Kittl’s Crop Tool
Kittl offers a comprehensive set of tools specifically designed for cropping and enhancing your images. To begin, open your desired image in Kittl and navigate to the Crop tool. Here, you’ll find a variety of options to customize your crop. Kittl provides intuitive controls, such as adjustable crop ratios, aspect ratio lock, and the ability to rotate the crop selection. These features allow you to experiment and achieve the desired composition for your image.
Perfecting Your Crop
To achieve professional-looking results, it’s important to pay attention to the finer details when cropping in Kittl. Take advantage of the grid overlay feature, which helps you align your subject matter with the rule of thirds or other composition guidelines. This can create a more visually pleasing and balanced image. Additionally, Kittl allows you to straighten horizons and correct perspective distortions, ensuring that your final crop is both accurate and visually appealing.
Advanced Techniques and Creative Cropping
While Kittl excels at standard cropping tasks, it also offers advanced techniques and creative options to take your image editing to the next level. Explore the “Content-Aware Crop” feature, which intelligently fills in the gaps left after cropping, seamlessly blending the image. This powerful tool can be especially useful when you need to adjust the aspect ratio or remove unwanted elements without compromising the overall composition. With Kittl, you have the freedom to experiment and unleash your creativity.
Related: How To Translate Video Voice To Text
An Introduction to Kittl Designer – Tutorial Video & Transcript
Have you ever wished for a comprehensive and user-friendly image editing tool that offers a wide range of features? Look no further than Kittl Designer! In this section, we will introduce you to Kittl Designer, a powerful image editing software that caters to both beginners and professionals alike. With its intuitive interface and extensive capabilities, Kittl Designer empowers users to bring their creative visions to life. To help you get started, we have prepared a tutorial video and transcript that will walk you through the essential features and functionalities of Kittl Designer.
Tutorial Video: Unleashing the Power of Kittl Designer
[Insert video thumbnail and brief description]
In this tutorial video, we will take you on a guided tour of Kittl Designer, showcasing its key features and demonstrating how you can make the most of this powerful image editing software. Follow along as we explore the various tools and techniques available in Kittl Designer, allowing you to enhance, retouch, and transform your images like never before. Whether you’re a photography enthusiast, a graphic designer, or simply someone who loves to create visually stunning content, this tutorial video will provide you with valuable insights and practical tips to make the most of Kittl Designer.
Tutorial Transcript: Step-by-Step Instructions
[Insert transcript of tutorial video]
Welcome to this comprehensive tutorial on Kittl Designer! In this transcript, we will guide you through the essential features and functionalities of this powerful image editing software. Let’s get started!
Interface Overview: We begin by familiarizing ourselves with the Kittl Designer interface. From the toolbar to the layers panel and various editing options, we’ll show you how to navigate the software efficiently.
Basic Editing Tools: Learn how to perform essential edits such as cropping, resizing, and adjusting brightness, contrast, and saturation. Discover how to use the selection tools for precise adjustments.
Advanced Editing Techniques: Dive deeper into Kittl Designer’s capabilities as we explore advanced techniques such as retouching blemishes, removing objects, and applying creative filters and effects.
Layer Management: Understand the power of layers and how they allow you to work non-destructively. Discover how to create, organize, and manipulate layers to achieve complex edits and compositions.
Text and Typography: Explore the text and typography features in Kittl Designer. Learn how to add and format text, apply artistic effects, and create visually appealing designs using various fonts and styles.
Kittl Designer Walk Thru – Transcription Below
Welcome to our Kittl Designer walk-through! In this section, we will provide you with a detailed transcription of a step-by-step walk-through of Kittl Designer, a powerful image editing software. Whether you’re new to Kittl Designer or looking to explore its features in more depth, this transcription will guide you through the software’s interface, tools, and functionalities. Get ready to unleash your creativity and discover the endless possibilities of Kittl Designer.
Transcription:
[Start of Walk-Thru]
Speaker 1: Welcome to this Kittl Designer walk-through. Today, we’ll be exploring the various features and tools of this powerful image editing software. Let’s get started!
Speaker 2: When you open Kittl Designer, you’ll be greeted with a clean and intuitive interface. The toolbar at the top provides easy access to all the essential editing tools. On the left side, you’ll find the layers panel, where you can manage and manipulate your layers.
Speaker 1: Now, let’s dive into the basic editing tools. To start, select an image by clicking on “File” and then “Open.” Once the image is loaded, you can use the crop tool to remove any unwanted portions or adjust the composition.
Speaker 2: Next, let’s explore the adjustment options. Click on “Adjustments” in the toolbar, and a dropdown menu will appear. Here, you can fine-tune the brightness, contrast, saturation, and other parameters to enhance your image.
Speaker 1: For more advanced edits, such as retouching blemishes or removing unwanted objects, head over to the retouching tools. You’ll find the healing brush, clone stamp, and other retouching options in the toolbar. Simply select the desired tool and apply it to the areas you want to fix.
Speaker 2: Layers play a crucial role in Kittl Designer. They allow you to work non-destructively and make adjustments without affecting the original image. To add a new layer, click on the “New Layer” button in the layers panel. You can then apply various effects and adjustments to each layer separately.
Speaker 1: Text and typography are also integral to Kittl Designer. To add text to your image, select the text tool from the toolbar and click on the canvas. A text box will appear, allowing you to type and format your text. You can experiment with different fonts, sizes, colors, and even apply text effects.
Speaker 2: Lastly, let’s talk about exporting your edited image. When you’re satisfied with your edits, go to “File” and then “Export.” Choose your desired format, adjust the quality settings if needed, and click “Export” to save your image.
[End of Walk-Thru]
Featured Kittl Designs (Top left) & New Projects
In this section, we will showcase some of the featured Kittl designs that exemplify the creative possibilities and versatility of this remarkable image editing software. From stunning photo manipulations to captivating digital artwork, these featured designs demonstrate the ingenuity and skill of Kittl users. Additionally, we will explore new projects created with Kittl, highlighting the innovative and inspiring work being done by artists, photographers, and graphic designers in the Kittl community. Get ready to be inspired as we delve into the world of featured Kittl designs and discover the exciting new projects emerging from this vibrant creative community.
Featured Kittl Designs
The featured Kittl designs are a testament to the incredible potential of the software in the hands of talented artists and designers. One such design showcases a breathtaking landscape transformed into a whimsical fantasy scene, with vibrant colors and magical elements seamlessly integrated. The attention to detail and skillful manipulation of the image demonstrate the power of Kittl to bring imagination to life.
Another featured design highlights the versatility of Kittl for creating stunning portrait retouching. The artist has flawlessly enhanced the subject’s features, achieving a natural and polished look while maintaining the authenticity and individuality of the person. Kittl’s retouching tools, coupled with the artist’s expertise, result in a striking transformation that captures the essence of the subject.
New Projects
In addition to the featured Kittl designs, the Kittl community is constantly buzzing with new and exciting projects. Artists, photographers, and graphic designers continue to push the boundaries of creativity using Kittl’s extensive feature set. One notable project involves a series of digital illustrations inspired by nature and wildlife. The artist masterfully combines textures, colors, and intricate details to bring various animals to life on the digital canvas. The result is a collection of captivating and visually stunning artworks that evoke a sense of wonder and appreciation for the natural world.
Another new project showcases the versatility of Kittl for graphic design. A graphic designer has created a series of eye-catching posters for a music festival, seamlessly blending typography, imagery, and vibrant colors. The dynamic compositions and attention-grabbing visuals perfectly capture the essence of the festival, enticing viewers to attend the event.
Build Designs from Scratch in Kittl
In this section, we will explore the process of building designs from scratch in Kittl, an innovative image editing software. Whether you’re a graphic designer, an illustrator, or simply someone who loves creating visually stunning artwork, Kittl provides a comprehensive set of tools and features to bring your creative visions to life. From conceptualizing ideas to executing intricate designs, we will guide you through the steps involved in building designs from scratch using Kittl. Get ready to unleash your imagination and embark on a journey of artistic expression with Kittl.
Step 1: Planning and Conceptualizing
Before diving into Kittl, it’s essential to start with a clear plan and concept for your design. Spend some time brainstorming ideas, sketching rough drafts, and considering the overall style and mood you want to convey. Define the purpose of your design and identify the key elements that will make it visually impactful.
Step 2: Setting Up the Canvas and Layers
Once you have a clear concept in mind, open Kittl and create a new document. Set the canvas size and resolution based on your intended output. Consider factors such as print or digital media and the required dimensions. Next, organize your design elements using layers. Create a base layer and additional layers for different elements such as backgrounds, illustrations, text, and effects. This layer-based approach allows for better control and flexibility during the design process.
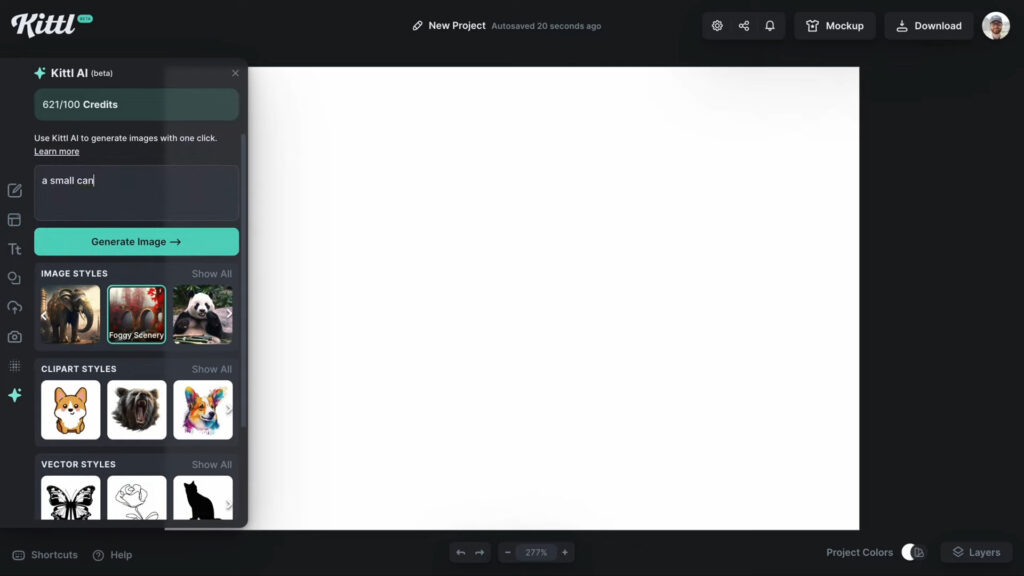
Step 3: Adding and Manipulating Elements
With your canvas and layers set up, it’s time to start adding and manipulating elements in Kittl. Import or create the key visual components of your design, such as images, illustrations, or vector shapes. Use Kittl’s editing tools to resize, rotate, and position these elements on the canvas. Experiment with blending modes, opacity adjustments, and layer masks to achieve the desired effects and compositions.
Step 4: Applying Effects and Enhancements
To add depth and visual interest to your design, leverage Kittl’s effects and enhancement features. Apply gradients, shadows, glows, or filters to specific elements or the overall composition. Experiment with adjusting colors, saturation, and contrast to achieve the desired mood and atmosphere. Kittl offers a wide range of creative possibilities to transform your design and make it truly unique.
Step 5: Typography and Text
Typography plays a crucial role in design. Use Kittl’s text tools to add titles, captions, or other textual elements to your design. Experiment with different fonts, sizes, and styles to find the perfect typography that complements your overall composition. Kittl also offers text effects and formatting options to further enhance your text elements, such as applying shadows, gradients, or custom text paths.
Color Palettes & Naming Designs in Kittl
In this section, we will explore two essential aspects of design in Kittl: color palettes and naming designs. Color palettes play a crucial role in establishing the mood, harmony, and visual impact of your designs, while naming your designs helps you organize and identify them easily. We’ll delve into how Kittl can assist you in creating and managing color palettes and provide tips on effectively naming your designs. Let’s dive in and discover how these elements contribute to the overall design process in Kittl.
Related: How Much Does Motion Capture Cost
Color Palettes
Kittl offers various tools and features to create and manage color palettes for your designs. Begin by exploring Kittl’s color picker, which allows you to select colors from the spectrum or input specific values. You can save these colors into swatches for quick access and reuse. Additionally, Kittl provides color palette generators that generate harmonious color schemes based on a single color or predefined rules like complementary or analogous colors. Experiment with these palettes to find the perfect combination that enhances your design’s visual appeal.
Naming Designs
Naming your designs is vital for organization and easy identification. In Kittl, you can assign names to your design files during the saving process. To ensure clarity and consistency, consider using descriptive and relevant names that reflect the design’s purpose, theme, or content. This will help you quickly locate and reference your designs in the future. It’s also beneficial to establish a naming convention that aligns with your workflow. For example, you can include project names, version numbers, or dates in your file names to easily track iterations or revisions.
Kittl Subscriptions & Try it for Free
In this section, we will explore Kittl’s subscription options and the opportunity to try the software for free. Kittl offers a range of subscription plans that cater to different needs and budgets, providing access to its powerful image editing tools and features. Additionally, Kittl provides a free trial period for users to experience the software before committing to a subscription. Let’s delve into the details of Kittl’s subscription options and how you can give it a try without any cost.
Kittl Subscription Plans
Kittl offers flexible subscription plans to accommodate a variety of user requirements. These plans typically include different levels of access and features, allowing you to choose the one that best suits your needs. Subscription plans may range from basic to advanced, offering varying capabilities, storage options, and support levels. The pricing structure is often based on a monthly or annual payment model, with discounts often available for longer-term commitments. By subscribing to Kittl, you gain access to its extensive array of image editing tools, filters, effects, and other advanced features, empowering you to take your design projects to new heights.
Try Kittl for Free
If you’re curious about Kittl and want to experience its capabilities firsthand, you can take advantage of the free trial period offered by the software. The free trial allows you to explore Kittl’s features and functionalities without any cost or commitment. During this trial period, you can test out the software, experiment with its tools, and determine if it aligns with your workflow and design requirements. The duration of the free trial may vary depending on the promotion or offer at the time. It’s an excellent opportunity to get a feel for Kittl’s interface, performance, and overall user experience before deciding to subscribe.
Conclusion:
Cropping is a fundamental editing technique that allows you to trim or remove unwanted parts of an image to achieve better composition or focus on specific areas. In Kittl, cropping is a straightforward process that can be accomplished using its intuitive tools and features. Here’s a summary of how to crop in Kittl:
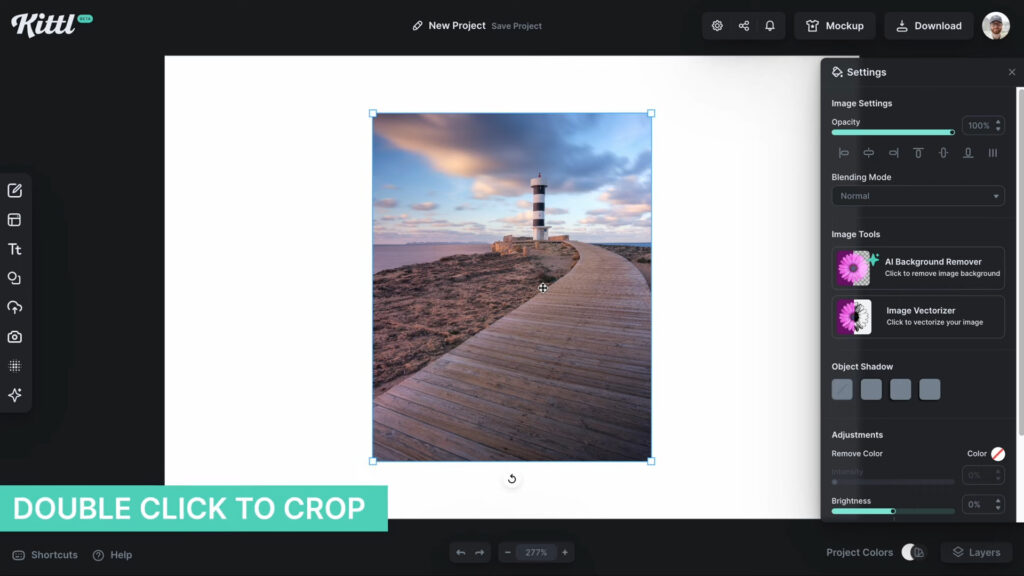
Open the image: Launch Kittl and open the image you want to crop.
Select the Crop tool: Locate the Crop tool in the Kittl toolbar. It is typically represented by a rectangle or crop icon.
Adjust the crop area: Click and drag on the image to create a selection box that outlines the area you want to keep. You can resize and reposition the selection using the handles around the box.
Fine-tune the crop: Use the options or settings provided by Kittl to refine your crop. You may have options for aspect ratio, resolution, or other parameters depending on your specific needs.
Apply the crop: Once you are satisfied with the crop selection and adjustments, click on the “Apply” or “Crop” button to finalize the changes. The image will be cropped, and the unwanted portions will be removed.
Save the cropped image: After cropping, save the image as a new file to preserve the original version. Kittl typically provides options to save in different file formats, such as JPEG, PNG, or TIFF.
By following these steps, you can effectively crop images in Kittl to achieve better compositions or remove unwanted elements. Remember to experiment and utilize Kittl’s additional editing tools to enhance your cropped images further.
In conclusion, Kittl offers a user-friendly and efficient cropping process that allows you to trim and focus your images precisely. With its intuitive tools and options, you can crop images effortlessly and achieve the desired results. Incorporate cropping into your Kittl editing workflow to refine your compositions and create visually appealing imagery.
FAQs
Q1: How do I crop an image in Kittl?
A1: To crop an image in Kittl, follow these steps: 1) Open the image in Kittl. 2) Select the Crop tool from the toolbar. 3) Click and drag to create a selection box around the area you want to keep. 4) Adjust the crop using the handles. 5) Fine-tune the crop options if available. 6) Apply the crop by clicking the “Apply” or “Crop” button. Finally, save the cropped image as a new file.
Q2: Can I maintain a specific aspect ratio while cropping in Kittl?
A2: Yes, Kittl provides the option to maintain a specific aspect ratio while cropping. When using the Crop tool, you can choose from various preset aspect ratios or enter a custom ratio. This feature ensures that your cropped image retains the desired proportions.
Q3: Is it possible to undo or reset a crop in Kittl?
A3: Absolutely! Kittl allows you to undo or reset a crop if you are not satisfied with the results. Simply go to the Edit menu and select “Undo Crop” or use the Ctrl+Z (Cmd+Z on Mac) shortcut to revert the crop. This action will restore the image to its original state before the crop was applied.
Q4: Can I crop multiple images simultaneously in Kittl?
A4: Kittl does not have a built-in feature to crop multiple images simultaneously. However, you can open multiple images in Kittl and apply the crop individually to each image. This allows you to crop multiple images consecutively, but each image will require a separate crop action.